I had a standard wooden crate left, which I already used as bedside table.
Buy it here (Switzerland): Buy Wooden Crate
Only the screen needs to be turned from the inside to the outside.
The keyboard and the touchpad are non functional anymore. I thought, ok, now I can turn the screen to the outside without a big loss. If it is gone, it's gone. But it works...
Here is how you get the screen off. Just turn it and fiddle it back on.
https://www.youtube.com/watch?v=IqNpRGFgg0Q
STOP at 3.50! Don't pull out the cable! Just turn it 180degrees viewed from the top, not from the side, else the screen is mounted upside down.
You then need to adjust the cover a little bit with the dremel, so that you can use the back side on the inside and the front side on the outside. I removed the camera, I don't need it. The cover will not fit exactly (on the side), but it will cover as mostly as good as in the original configuration. You can even put the screws for the cover back on (with this model, at least).
Then I got some nails and a metal plate from an old computer housing. The plate is the ground for the laptop to stand on. I measured how heigh the screen is, and then hit the nails into the crate, where the laptop should stand. Then I put the plate in, on that the laptop, and hit some other nails on top of the laptop to fix it. Now it cannot "flip" out of the box.
The laptop fits so exactly, that on the front side I can put in the power cable and on the "back" side (of the box) there is room for the audio cable, exactly so, that the laptop will be fixed from moving to the front/back. On the other side of the box, I had to drill a hole to get at least one USB-port free, which I used for the external keyboard.
 |
| Holding nails and perfect fitting cables. (The hole is from a previous setup and...I cannot remove a hole ;) ) |
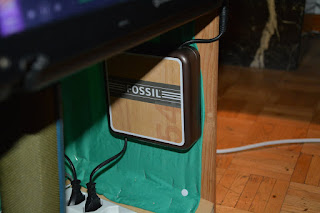
The laptop has a loooong cable which does look ugly if it is "just in the box". Luckily, our local jewelry store keeps the jewelry boxes from Fossil (http://fossil.com), which I get from time to time for free. I already built two RasPis into such boxes, they are very nice.
I had a box left where the cable just fits in. I made two holes for the cable on the side, two holes for the screws in the back and another hole into the top side to fix it with a screw when it is assembled.
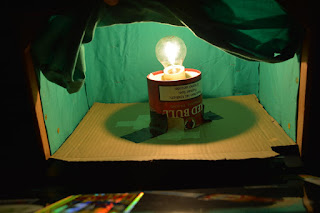
Then I made a light into the box. Just a standard light fixed on a tobbacco box and with a switch, no big deal. To not press the (functioning ;) ) keys, I fixed the light on a cardboard which fits exactly in the box, cut out a tiny bit for the cable and put it over the laptop.
I put in some standard white A4 paper into the inside of the box to cover the free spaces.
It was way to bright. I thought the screen on the front side would swallow the light, but it doesn't.
Luckily (again), I had an old duvet cover left in a nice green color.
I moved all the stuff out of the box and used a staple gun to put the fabric inside. The cable box was then assembled to the box again with the fabric between. WARNING: Use an "industrial" staple gun (for wood), not a standard bureau staple gun. I needed about 20 staples until ONE got in right, for every one. Later I borrowed the right staple gun from a friend...
 |
The fabric must cover all the holes on the top of the box. The light will shine through the smallest hole, so cover it. ;)
(I show the image of the light just here and not above, because there is no image with the light and no fabric.)
I made a front cover out of fabric for behind the screen, built in 3 (three) magnets on each side and stapled the top side to the top (inside) of the box. I used some metal pins (standard bureau pins) in the box for the magnets to hold on.
A friend got me a flat USB-hub with a flat cable. I got rid of the plastic housing and made a cigarillo-box housing for it. Just put the hub between some paper to shield it from the housing metal.
That is the only thing which I glued to the box.
 |
Last but not least, there is a standard power strip. I cut the cable to make the hole in the fabric as small as possible, and connected it again together on the outside of the box.
The laptop should have WiFi but no Bluetooth is needed because the audio cable fixes the laptop on the box anyway. So, why not use it? (This model does not have BT, either.)
[EDIT: 2016-11-11]: Some key was pressed all the time from the broken keyboard. I ripped the whole thing off. Luckily, the power button has its own cable. I glued it to the side of the box.
 |
| The button is the small metal thingy above the cable strip. The big glowing thingy is just the power LED. |
I use it for:
+ Putting stuff on it.
+ Listening to music (Spotify, Youtube)
+ Watching TV with a decent background light. (On a real TV, not this little screen.)
+ Playing Endless Sky and Minecraft Classic on my own server "Super Ben0bi World".
+ Da Interweb, google and stuff... ;)
+ Zonk out with a decent background light and decent background music. ;)
I hope you like it. I hope you build your own one. Look how it glows...
 |
| I cannot live without it anymore. :) |
Update, Version 1.1
December 2016 (Written: 1.1.2017)I really use that thing. Did not think about that. :) In fact, I love it, it is the second most used computer in my home.
I added some stuff. There is now an "internal" USB-extender with some cables for smartphones and stuff, and a card reader, which is also "internal". I exchanged the bulb for a LED-bulb because this will not break so fast. On the top is now a layer of transparent black plastic foil to cover the internals from...coffee. ;)
Also, I found a wonderful LoFi-System (It's not Hi, you know, it's cheap.), which fits EXACTLY into the box. It is a "SilverCrest SMBC 30 A1", and "can" Bluetooth, 1xAUX, FM-Radio, CD and USB. It is also delivered with a remote. Can say nothing for just 99CHF. Other stores would only sell the front plate for 99.-... XD
On the product photos, the LED-display is "cheap-red" but in original it is in "soft-nice-orange" and can be dimmed in 4 steps inclusive turnig it off.
Photos:
The card reader is fixed with fabric on the side.
The Fossil-box is not gone, it is now under the music box
The internal USB is connected to the external one on the bottom side.
Thanks for your attention. Please like. Please comment. Please follow this channel....wait, this is not youtube nor facebook...lucky me... :)


